Settings
The Operator can setup their own system by using the Settings page in the Back Office. There are 5 main sections that Operator can setup.
- Game Integration: the settings relate to the play site, gaming flow and Tenant information
- Payment Integration: the settings of Payment providers (integrate the 3rd party)
- SBO Integration: the settings of SBO integration (getting data and games from SBO)
- Splash Screen: the settings to change Splash Screen (turn off, change the splash screen types)
- Template: setup the Title, Logo and favicon
- After signed in, click on the Settings on the left menu
- Click on the App setting
Game Integration
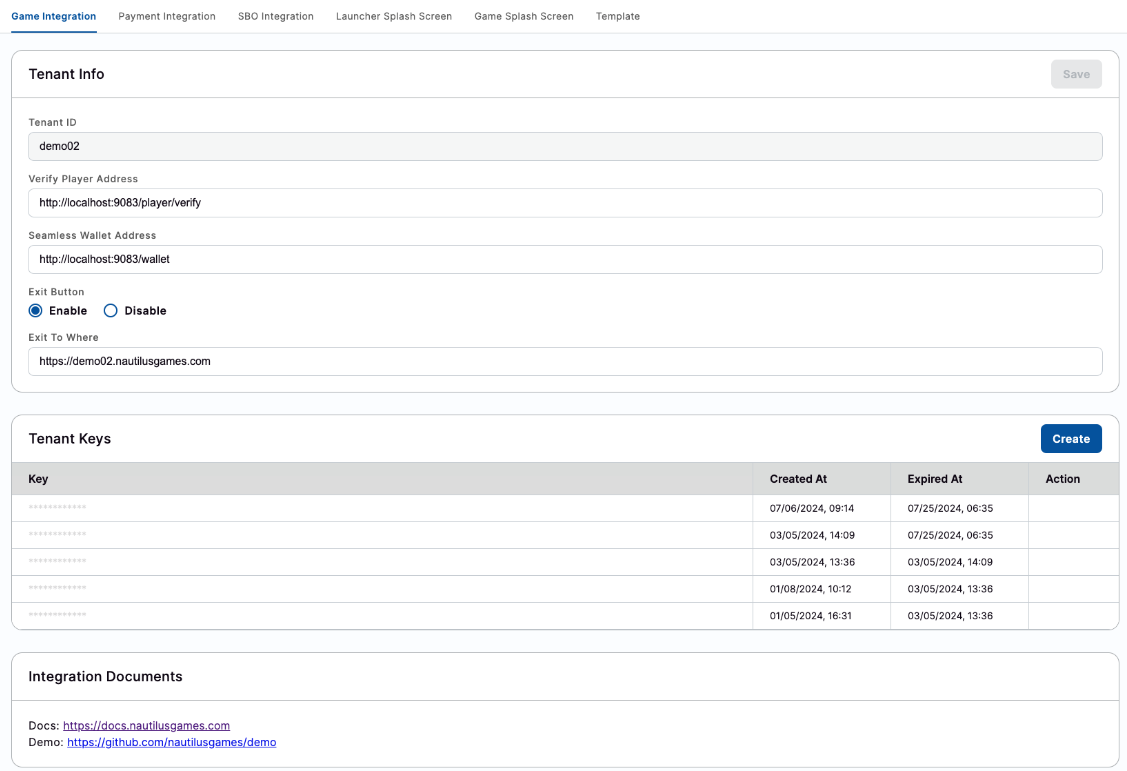
In the Game Integration tab, Operator gonna see the information of:
TENANT INFO
- Tenant ID: the ID of Tenant
- this field cannot edit
- Verify Player Address: the URL of Player Wallet address
- Operator can edit this field
- Seamless Wallet Address: the URL of Wallet Address
- Operator can edit this field
- Exit Button: displaying the Exit button in the games or not
- Operator can edit this field
- default is DISABLED
- Exit To Where: the destination when clicking on button Exit
- Operator can edit this field
- default is DISABLED
- this field will be enabled only when the Exit button is ENABLED
TENANT KEYS
The play site cannot be used if there is no Tenant Key. Therefore, please make sure that the Tenant Key was created.
The list of Tenant Keys will be displayed in the table:
- Key: the key content
- the value is hidden for the security purpose
- Created At: the created time of the key
- Expired At: the expiration time of the key
- Action: disable key
- only can disable the activated key. The expired key cannot disable
INTEGRATION DOCUMENTS
The document about Integration and the Demo will be displayed here.
- Docs: the URL of the Integration Document
- Demo: the URL of the Integration Demo
CREATE TENANT KEY
Operator can create a new Tenant Key by clicking on the Create button in the list of Tenant Key.

At the Create Tenant Key popup, Operator needs to select the Expiration time.
- If Operator selects the Expiration time, it would be expired when reaching that time
- If the Operator does not select the time and leave it empty. It would be valid forever until the Operator disables it
After created, the new key will be displayed at the top of the list.
Payment Integration
The Payment Integration tab will display the integration keys of 2 current supported providers:
- ALOPAY (default displaying)
- GLOBAL PAY
To integrate to these Payment Provider, Operator needs to
- Register account from these Providers
- Access to the Back Office
- After signed in, click on the Settings
- Click on the App Settings
- Click on Payment Integration
- Filling the required fields
ALOPAY - The Intefration Keys of ALOPAY will contain:

- Merchant Code: (this field will be provided by the Payment Provider)
- API Key: (this field will be provided by the Payment Provider)
- Created At: the created time of this Key
- Action: disable key
- only can disable the activated key. The expired key cannot disable
GLOBAL PAY - The Intefration Keys of GLOBAL PAY will contain:
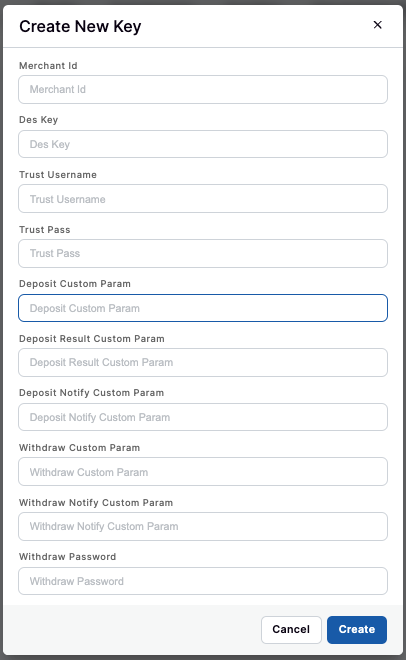
- Merchant ID: (this field will be provided by the Payment Provider)
- Des Key: (this field will be provided by the Payment Provider)
- Trust Username: (this field will be provided by the Payment Provider)
- Trust Pass: (this field will be provided by the Payment Provider)
- Deposit Custom Param: (this field will be provided by the Payment Provider)
- Deposit Result Custom Param: (this field will be provided by the Payment Provider)
- Deposit Notify Custom Param: (this field will be provided by the Payment Provider)
- Withdraw Custom Param: (this field will be provided by the Payment Provider)
- Withdraw Notify Custom Param: (this field will be provided by the Payment Provider)
- Withdraw Password: (this field will be provided by the Payment Provider)
After created, the new key will be displayed at the top of the list.
SBO Integration
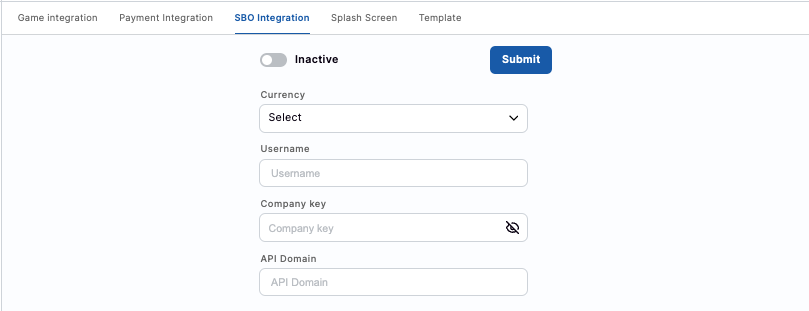
To integrate to the SBO, the Operator needs to:
- Create the account from the SBO
- Access to the Back Office
- After signed in, click on the Settings
- Click on the App Settings
- Click on SBO Integration
- Filling the required fields:
- Currency (from the SBO Account)
- Username (from the SBO Account)
- Company Key (from the SBO Account)
- API Domain (from the SBO Account)
- Click on button Submit to complete.
Splash Screen
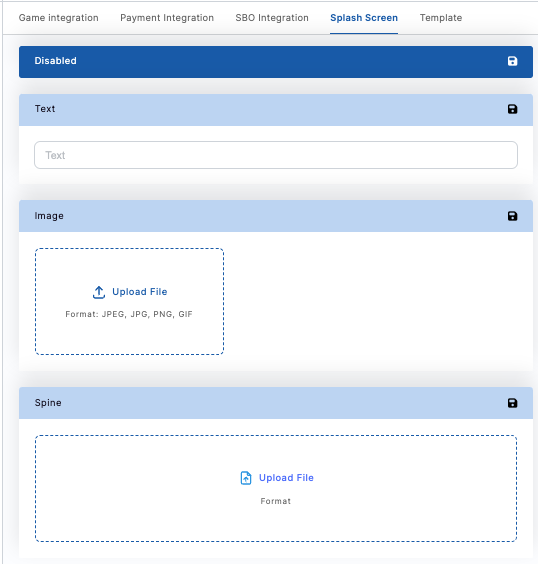
Nautilus supports the Operator to custom the Splash Screen with multiple formats:
- Text only: displaying Text in the Splash Screen
- Image only: displaying Image in the Splash Screen
- Spine: executing the Spine file in the Splash Screen
To setup the Splash Screen, Operator needs to:
- After signed in, click on the Settings
- Click on the App Settings
- Click on Splash Screen
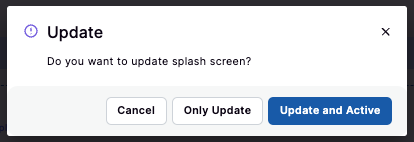
If want to disable Splash Screen:
- Click on the Disabled option
- At the confirmation popup:
- Click on Update and Active: to save and active
- Click on Only Update: to save (and do not active)
- Click on Cancel: to discard the changes
If want to use the Text:
- Click on the Text option
- At the confirmation popup:
- Click on Update and Active: to save and active
- Click on Only Update: to save (and do not active)
- Click on Cancel: to discard the changes
If want to use the Image:
- Click on the Image option
- At the confirmation popup:
- Click on Update and Active: to save and active
- Click on Only Update: to save (and do not active)
- Click on Cancel: to discard the changes
If want to use the Spine:
- Click on the Spine option
- At the confirmation popup:
- Click on Update and Active: to save and active
- Click on Only Update: to save (and do not active)
- Click on Cancel: to discard the changes
Template
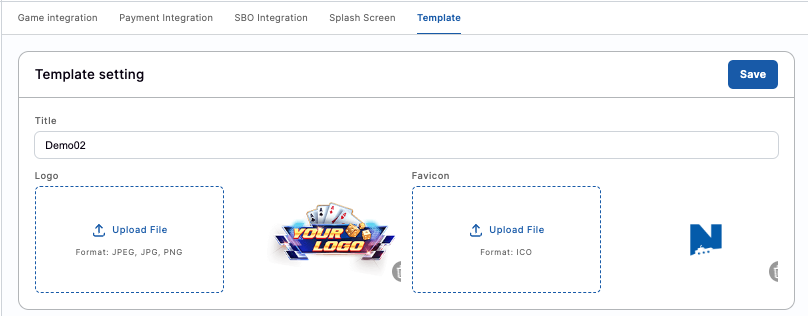
Operator can change the Title, Logo and the Favicon of the play site directly from the Back Office.
To change those items, Operator needs to:
- After signed in, click on the Settings
- Click on the App Settings
- Click on Template
- Change the Tile/ Logo image or the Favicon
- After changed, click on button Save to complete.
At that time, the new changed will be apllied to the play site.